# flink 实战项目 1
# 项目概述
本项目旨在通过 Flink 实现将实时数据从其他数据库实时同步至 StarRocks 数据库,以实现数据的实时更新和分析,加快查询报表的查询速度和效率。
# 项目架构
数据源:SqlServer
数据同步工具:Apache Flink (1.14.0)
数据同步工具的可视化操作工具:DINKY (0.7.2)
数据目标:StarRocks 数据库(3.1.2)
单机部署的方式:
确定服务器支持 avx2
cat /proc/cpuinfo | grep avx2
有打印内容说明支持
上传 StarRocks 安装包安装
详情可以看 StarRocks 数据库的使用章节
官网下载 flink(这里的版本的是 1.16.1) 上传服务器并解压, 下面是解压后的结构
[root flink-1.14.0]# ll
总用量 508drwxrwxrwx. 2 1000 1000 4096 11月 7 2023 bin
drwxrwxrwx. 2 1000 1000 4096 9月 22 2021 conf
drwxrwxrwx. 7 1000 1000 4096 9月 22 2021 examples
drwxrwxrwx. 2 1000 1000 4096 11月 21 10:45 lib
-rwxrwxrwx. 1 1000 1000 11357 10月 29 2019 LICENSE
drwxrwxrwx. 2 1000 1000 4096 9月 22 2021 licenses
drwxrwxrwx. 2 1000 1000 16384 5月 8 16:06 log
-rwxrwxrwx. 1 1000 1000 458497 9月 22 2021 NOTICE
drwxrwxrwx. 3 1000 1000 4096 9月 22 2021 opt
drwxrwxrwx. 10 1000 1000 4096 9月 22 2021 plugins
-rwxrwxrwx. 1 1000 1000 1309 1月 30 2021 README.txt
[root flink-1.14.0]# pwd
/home/flink-1.14.0
下载 dinky 上传服务器并解压,下面是解压后的结构
[root@sanzi-bigdata-server dlink-release-0.7.2]# ll
总用量 52-rwxrwxrwx. 1 root root 2973 11月 24 12:04 auto.sh
drwxrwxrwx. 3 root root 4096 4月 1 17:55 config
drwxrwxrwx. 2 root root 4096 11月 24 12:04 jar
drwxrwxrwx. 2 root root 20480 11月 24 12:07 lib
drwxrwxrwx. 7 root root 4096 11月 24 12:05 plugins
drwxrwxrwx. 3 root root 4096 11月 24 12:05 sql
drwxrwxrwx. 3 root root 4096 11月 24 12:05 tmp
[root@sanzi-bigdata-server dlink-release-0.7.2]# pwd
/home/dlink-release-0.7.2
安装 mysql(由于 dinky 需要依赖 mysql)可以安装 linux 或者 windows 都可以,我这边是直接压缩包安装到 windows 服务器
修改 flink 配置,需要将 dlink 的依赖添加到 flink lib 下,还有 starrocks 和 sqlserver 提供的 cdc 包:flink-connector-starrocks-1.2.6_flink-1.15.jar、flink-sql-connector-sqlserver-cdc-2.3.0.jar。官网
cp -r flink-connector-starrocks-1.2.6_flink-1.15.jar /home/flink-1.14.0/lib
cp -r flink-sql-connector-sqlserver-cdc-2.3.0.jar /home/flink-1.14.0/lib
cp -r /home/dlink-release-0.7.2/plugins/flink1.14 /home/flink-1.14.0/lib
#结构:[root@sanzi-bigdata-server lib]# pwd
/home/flink-1.14.0/lib
[root@sanzi-bigdata-server lib]# ll
总用量 237364-rwxrwxrwx. 1 root root 21672 11月 2 2023 dlink-catalog-mysql-1.14-0.7.2.jar
-rwxrwxrwx. 1 root root 165868 11月 2 2023 dlink-client-1.14-0.7.2.jar
-rwxrwxrwx. 1 root root 16245 11月 2 2023 dlink-client-base-0.7.2.jar
-rwxrwxrwx. 1 root root 14853272 4月 28 2023 flink-connector-starrocks-1.2.6_flink-1.14_2.12.jar
-rwxrwxrwx. 1 1000 1000 85588 9月 22 2021 flink-csv-1.14.0.jar
-rwxrwxrwx. 1 1000 1000 136045730 9月 22 2021 flink-dist_2.12-1.14.0.jar
-rwxrwxrwx. 1 1000 1000 153148 9月 22 2021 flink-json-1.14.0.jar
-rwxrwxrwx. 1 root root 2424144 4月 28 2023 flink-shaded-guava-18.0-13.0.jar
-rwxrwxrwx. 1 1000 1000 7709731 9月 1 2021 flink-shaded-zookeeper-3.4.14.jar
-rwxrwxrwx. 1 root root 16556476 5月 4 2023 flink-sql-connector-sqlserver-cdc-2.3.0.jar
-rwxrwxrwx. 1 1000 1000 39620756 9月 22 2021 flink-table_2.12-1.14.0.jar
-rwxrwxrwx. 1 1000 1000 206756 9月 1 2021 log4j-1.2-api-2.14.1.jar
-rwxrwxrwx. 1 1000 1000 300365 9月 1 2021 log4j-api-2.14.1.jar
-rwxrwxrwx. 1 1000 1000 1745700 9月 1 2021 log4j-core-2.14.1.jar
-rwxrwxrwx. 1 1000 1000 23625 9月 1 2021 log4j-slf4j-impl-2.14.1.jar
#在将 flink lib 目录下的除 log*.jr 全部拷贝回来cp -r /home/flink-1.14.0/lib/flink*.jar /home/dlink-release-0.7.2/plugins/flink1.14/
#结构:[root@sanzi-bigdata-server flink1.14]# pwd
/home/dlink-release-0.7.2/plugins/flink1.14
[root@sanzi-bigdata-server flink1.14]# ll
总用量 235052-rwxrwxrwx. 1 root root 21673 11月 24 12:04 dlink-catalog-mysql-1.14-0.7.2.jar
-rwxrwxrwx. 1 root root 165868 11月 24 12:04 dlink-client-1.14-0.7.2.jar
-rwxrwxrwx. 1 root root 51828 11月 24 12:04 dlink-connector-jdbc-1.14-0.7.2.jar
-rwxrwxrwx. 1 root root 14853115 11月 24 12:04 flink-connector-starrocks-1.2.6_flink-1.15.jar
-rwxrwxrwx. 1 root root 85588 11月 24 12:04 flink-csv-1.14.0.jar
-rwxrwxrwx. 1 root root 136045730 11月 24 12:05 flink-dist_2.12-1.14.0.jar
-rwxrwxrwx. 1 root root 153148 11月 24 12:04 flink-json-1.14.0.jar
-rwxrwxrwx. 1 root root 2424144 11月 24 12:04 flink-shaded-guava-18.0-13.0.jar
-rwxrwxrwx. 1 root root 7709731 11月 24 12:04 flink-shaded-zookeeper-3.4.14.jar
-rwxrwxrwx. 1 root root 16556476 11月 24 12:05 flink-sql-connector-sqlserver-cdc-2.3.0.jar
-rwxrwxrwx. 1 root root 39620756 11月 24 12:05 flink-table_2.12-1.14.0.jar
修改 fink.yaml 配置文件
################################################################################# Licensed to the Apache Software Foundation (ASF) under one# or more contributor license agreements. See the NOTICE file# distributed with this work for additional information# regarding copyright ownership. The ASF licenses this file# to you under the Apache License, Version 2.0 (the# "License"); you may not use this file except in compliance# with the License. You may obtain a copy of the License at## http://www.apache.org/licenses/LICENSE-2.0## Unless required by applicable law or agreed to in writing, software# distributed under the License is distributed on an "AS IS" BASIS,# WITHOUT WARRANTIES OR CONDITIONS OF ANY KIND, either express or implied.# See the License for the specific language governing permissions and# limitations under the License.#################################################################################==============================================================================# Common#==============================================================================# The external address of the host on which the JobManager runs and can be# reached by the TaskManagers and any clients which want to connect. This setting# is only used in Standalone mode and may be overwritten on the JobManager side# by specifying the --host <hostname> parameter of the bin/jobmanager.sh executable.# In high availability mode, if you use the bin/start-cluster.sh script and setup# the conf/masters file, this will be taken care of automatically. Yarn# automatically configure the host name based on the hostname of the node where the# JobManager runs.jobmanager.rpc.address: localhost
# The RPC port where the JobManager is reachable.jobmanager.rpc.port: 6123
# The total process memory size for the JobManager.## Note this accounts for all memory usage within the JobManager process, including JVM metaspace and other overhead.jobmanager.memory.process.size: 14g
# The total process memory size for the TaskManager.## Note this accounts for all memory usage within the TaskManager process, including JVM metaspace and other overhead.taskmanager.memory.process.size: 13g
# To exclude JVM metaspace and overhead, please, use total Flink memory size instead of 'taskmanager.memory.process.size'.# It is not recommended to set both 'taskmanager.memory.process.size' and Flink memory.## taskmanager.memory.flink.size: 1280m#JVM 元空间taskmanager.memory.jvm-metaspace.size: 512m
# The number of task slots that each TaskManager offers. Each slot runs one parallel pipeline.taskmanager.numberOfTaskSlots: 150
# The parallelism used for programs that did not specify and other parallelism.parallelism.default: 1
taskmanager.memory.managed.fraction: 0.05
taskmanager.memory.network.fraction : 0.05
task.cancellation.timeout: 0
# The default file system scheme and authority.## By default file paths without scheme are interpreted relative to the local# root file system 'file:///'. Use this to override the default and interpret# relative paths relative to a different file system,# for example 'hdfs://mynamenode:12345'## fs.default-scheme#==============================================================================# High Availability#==============================================================================# The high-availability mode. Possible options are 'NONE' or 'zookeeper'.## high-availability: zookeeper# The path where metadata for master recovery is persisted. While ZooKeeper stores# the small ground truth for checkpoint and leader election, this location stores# the larger objects, like persisted dataflow graphs.## Must be a durable file system that is accessible from all nodes# (like HDFS, S3, Ceph, nfs, ...)## high-availability.storageDir: hdfs:///flink/ha/# The list of ZooKeeper quorum peers that coordinate the high-availability# setup. This must be a list of the form:# "host1:clientPort,host2:clientPort,..." (default clientPort: 2181)## high-availability.zookeeper.quorum: localhost:2181# ACL options are based on https://zookeeper.apache.org/doc/r3.1.2/zookeeperProgrammers.html#sc_BuiltinACLSchemes# It can be either "creator" (ZOO_CREATE_ALL_ACL) or "open" (ZOO_OPEN_ACL_UNSAFE)# The default value is "open" and it can be changed to "creator" if ZK security is enabled## high-availability.zookeeper.client.acl: open#==============================================================================# Fault tolerance and checkpointing#==============================================================================# The backend that will be used to store operator state checkpoints if# checkpointing is enabled. Checkpointing is enabled when execution.checkpointing.interval > 0.## Execution checkpointing related parameters. Please refer to CheckpointConfig and ExecutionCheckpointingOptions for more details.## execution.checkpointing.interval: 3min# execution.checkpointing.externalized-checkpoint-retention: [DELETE_ON_CANCELLATION, RETAIN_ON_CANCELLATION]# execution.checkpointing.max-concurrent-checkpoints: 1# execution.checkpointing.min-pause: 0# execution.checkpointing.mode: [EXACTLY_ONCE, AT_LEAST_ONCE]# execution.checkpointing.timeout: 10min# execution.checkpointing.tolerable-failed-checkpoints: 0# execution.checkpointing.unaligned: false## Supported backends are 'jobmanager', 'filesystem', 'rocksdb', or the# <class-name-of-factory>.#state.backend: filesystem
#检查点模式(精确一次与至少一次)execution.checkpointing.mode: EXACTLY_ONCE
# “DELETE_ON_CANCELLATION”:仅当拥有作业失败时,才会保留检查点状态。如果作业被取消,则会将其删除。# “RETAIN_ON_CANCELLATION”:当所属作业取消或失败时,将保留检查点状态。# “NO_EXTERNALIZED_CHECKPOINTS”:禁用外部化检查点。execution.checkpointing.externalized-checkpoint-retention: RETAIN_ON_CANCELLATION
#检查点在被丢弃之前可能需要的最长时间。#如果一次 Checkpoint 超过一定时间仍未完成,直接将其终止,以免其占用太多资源execution.checkpointing.timeout: 2min
#允许的检查点连续失败数。如果设置为 0,则意味着我们不容忍任何检查点失败。checkpoint 失败即任务失败execution.checkpointing.tolerable-failed-checkpoints: 100
#获取定期计划检查点的时间间隔#此设置定义基本间隔。设置 execution.checkpointing.max-concurrent-checkpoints 和 execution.checkpointing.min-pause 可延迟检查点触发execution.checkpointing.interval: 120min
#可能同时进行的最大检查点尝试次数。如果此值为 n,则在 n 次检查点尝试当前正在进行时,将不会触发任何检查点。要触发下一个检查点,需要完成一次检查点尝试或使其过期。execution.checkpointing.max-concurrent-checkpoints: 1
#检查点尝试之间的最小停顿execution.checkpointing.min-paus: 3min
#告诉我们是否应该对状态快照数据使用压缩#execution.checkpointing.snapshot-compression: true#要保留的已完成检查点的最大数量。state.checkpoints.num-retained: 20
#state.backend: filesystem# Directory for checkpoints filesystem, when using any of the default bundled# state backends.## state.checkpoints.dir: hdfs://namenode-host:port/flink-checkpointsstate.checkpoints.dir: file:///home/flink_points/flink-checkpoints
# Default target directory for savepoints, optional.## state.savepoints.dir: hdfs://namenode-host:port/flink-savepointsstate.savepoints.dir: file:///home/flink_points/flink-savepoints
# Flag to enable/disable incremental checkpoints for backends that# support incremental checkpoints (like the RocksDB state backend).## state.backend.incremental: false#开启增量检查点state.backend.incremental: true
#增大 Block 缓存#整个 RocksDB 共享一个 block cache,读数据时内存 cache 大小,该参数越大读数据时的缓存命中率越高,默认大小为 8MB,建议设置到 64~256MB。state.backend.rocksdb.block.cache-size:64mb
state.backend.latency-track.keyed-state-enabled: true
# Flink Task 本地状态恢复state.backend.local-recovery: true
#write buffer 和 level 阈值大小state.backend.rocksdb.writebuffer.size: 128m
state.backend.rocksdb.compaction.level.max-size-level-base: 320m
#write buffer 数量state.backend.rocksdb.writebuffer.count: 5
#state.backend.rocksdb.thread.num: 4
# The failover strategy, i.e., how the job computation recovers from task failures.# Only restart tasks that may have been affected by the task failure, which typically includes# downstream tasks and potentially upstream tasks if their produced data is no longer available for consumption.jobmanager.execution.failover-strategy: region
#发送方和接收方的心跳请求和接收超时heartbeat.timeout: 500000
#开启火焰图功能rest.flamegraph.enabled: true
#允许在所有的 TaskManager 上均匀地分布任务#cluster.evenly-spread-out-slots: true#==============================================================================# Rest & web frontend#==============================================================================# The port to which the REST client connects to. If rest.bind-port has# not been specified, then the server will bind to this port as well.##rest.port: 8081# The address to which the REST client will connect to##rest.address: 0.0.0.0# Port range for the REST and web server to bind to.##rest.bind-port: 8080-8090# The address that the REST & web server binds to##rest.bind-address: 0.0.0.0# Flag to specify whether job submission is enabled from the web-based# runtime monitor. Uncomment to disable.web.submit.enable: false
# Flag to specify whether job cancellation is enabled from the web-based# runtime monitor. Uncomment to disable.web.cancel.enable: false
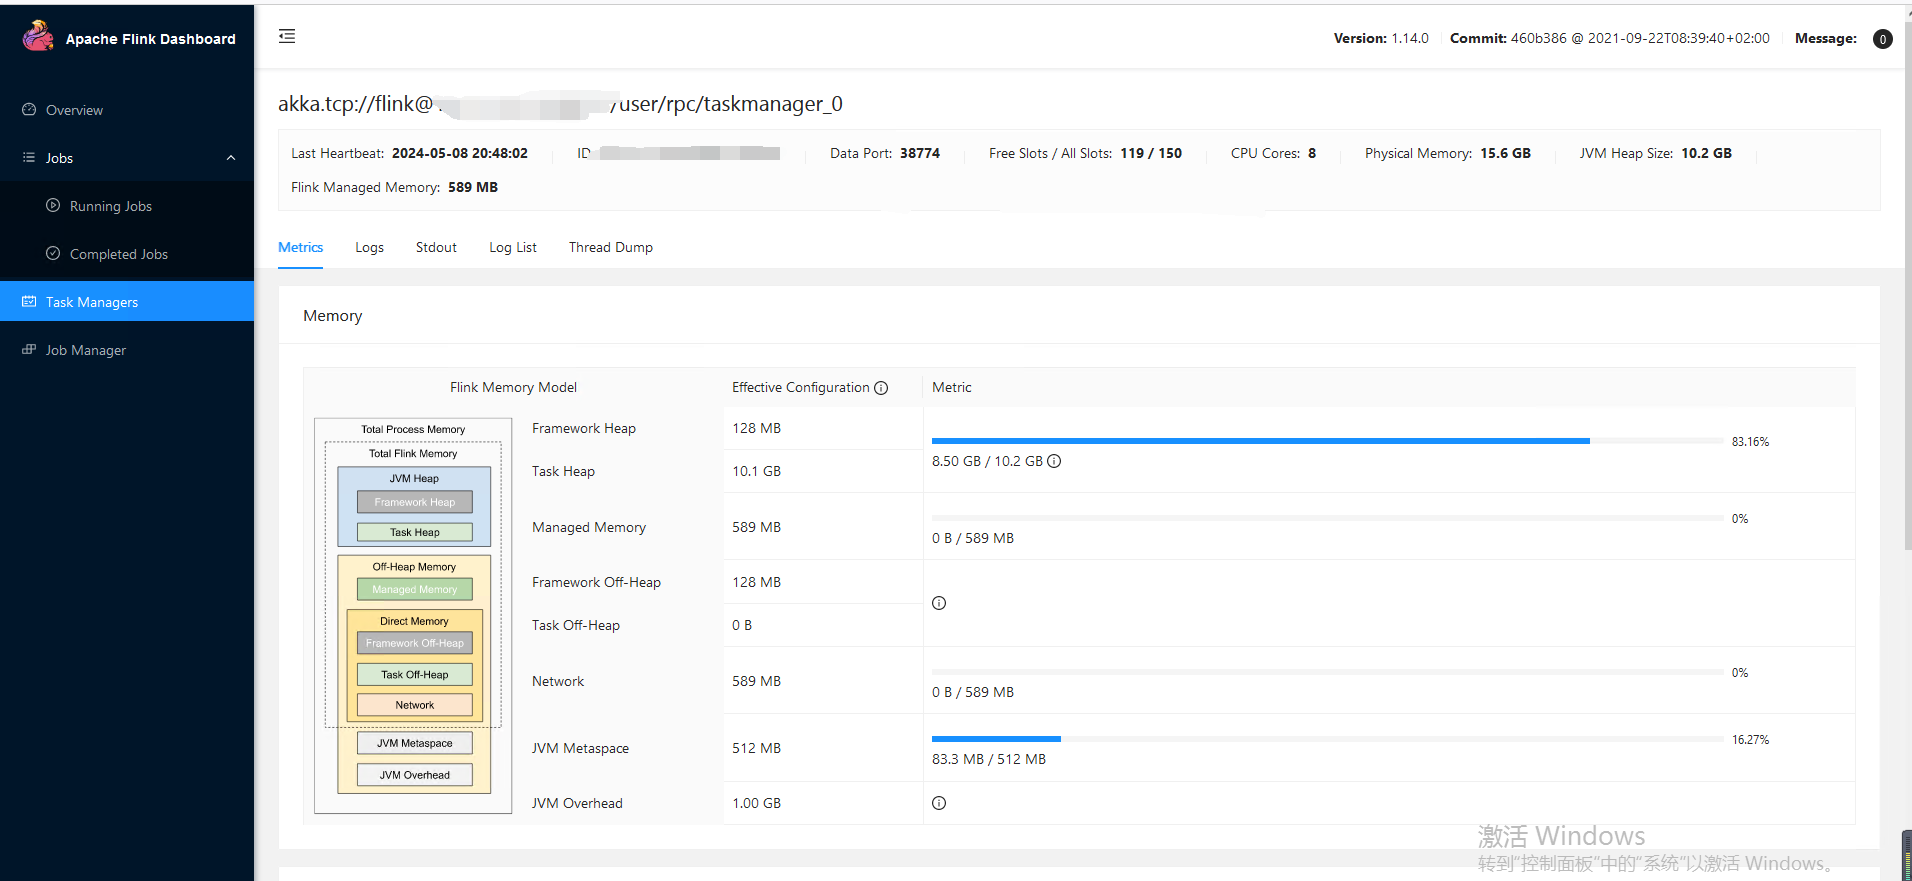
#==============================================================================# Advanced#==============================================================================# Override the directories for temporary files. If not specified, the# system-specific Java temporary directory (java.io.tmpdir property) is taken.## For framework setups on Yarn, Flink will automatically pick up the# containers' temp directories without any need for configuration.## Add a delimited list for multiple directories, using the system directory# delimiter (colon ':' on unix) or a comma, e.g.:# /data1/tmp:/data2/tmp:/data3/tmp## Note: Each directory entry is read from and written to by a different I/O# thread. You can include the same directory multiple times in order to create# multiple I/O threads against that directory. This is for example relevant for# high-throughput RAIDs.## io.tmp.dirs: /tmp# The classloading resolve order. Possible values are 'child-first' (Flink's default)# and 'parent-first' (Java's default).## Child first classloading allows users to use different dependency/library# versions in their application than those in the classpath. Switching back# to 'parent-first' may help with debugging dependency issues.## classloader.resolve-order: child-first# The amount of memory going to the network stack. These numbers usually need# no tuning. Adjusting them may be necessary in case of an "Insufficient number# of network buffers" error. The default min is 64MB, the default max is 1GB.## taskmanager.memory.network.fraction: 0.1# taskmanager.memory.network.min: 64mb# taskmanager.memory.network.max: 1gb#==============================================================================# Flink Cluster Security Configuration#==============================================================================# Kerberos authentication for various components - Hadoop, ZooKeeper, and connectors -# may be enabled in four steps:# 1. configure the local krb5.conf file# 2. provide Kerberos credentials (either a keytab or a ticket cache w/ kinit)# 3. make the credentials available to various JAAS login contexts# 4. configure the connector to use JAAS/SASL# The below configure how Kerberos credentials are provided. A keytab will be used instead of# a ticket cache if the keytab path and principal are set.# security.kerberos.login.use-ticket-cache: true# security.kerberos.login.keytab: /path/to/kerberos/keytab# security.kerberos.login.principal: flink-user# The configuration below defines which JAAS login contexts# security.kerberos.login.contexts: Client,KafkaClient#==============================================================================# ZK Security Configuration#==============================================================================# Below configurations are applicable if ZK ensemble is configured for security# Override below configuration to provide custom ZK service name if configured# zookeeper.sasl.service-name: zookeeper# The configuration below must match one of the values set in "security.kerberos.login.contexts"# zookeeper.sasl.login-context-name: Client#==============================================================================# HistoryServer#==============================================================================# The HistoryServer is started and stopped via bin/historyserver.sh (start|stop)# Directory to upload completed jobs to. Add this directory to the list of# monitored directories of the HistoryServer as well (see below).#jobmanager.archive.fs.dir: hdfs:///completed-jobs/# The address under which the web-based HistoryServer listens.#historyserver.web.address: 0.0.0.0# The port under which the web-based HistoryServer listens.#historyserver.web.port: 8082# Comma separated list of directories to monitor for completed jobs.#historyserver.archive.fs.dir: hdfs:///completed-jobs/# Interval in milliseconds for refreshing the monitored directories.#historyserver.archive.fs.refresh-interval: 10000启动 flink
./start-cluster.sh
![]()
修改 dlink 配置
spring:
datasource:
url: jdbc:mysql://${MYSQL_ADDR:127.0.0.1:3306}/${MYSQL_DATABASE:dinky}?useUnicode=true&characterEncoding=UTF-8&autoReconnect=true&useSSL=false&zeroDateTimeBehavior=convertToNull&serverTimezone=Asia/Shanghai&allowPublicKeyRetrieval=true
username: ${MYSQL_USERNAME:dinky}
password: ${MYSQL_PASSWORD:123456}
driver-class-name: com.mysql.cj.jdbc.Driver
application:
name: dlink
mvc:
pathmatch:
matching-strategy: ant_path_matcher
format:
date: yyyy-MM-dd HH:mm:ss
#json 格式化全局配置jackson:
time-zone: GMT+8
date-format: yyyy-MM-dd HH:mm:ss
main:
allow-circular-references: true
# 默认使用内存缓存元数据信息,# dlink 支持 redis 缓存,如有需要请把 simple 改为 redis,并打开下面的 redis 连接配置# 子配置项可以按需要打开或自定义配置cache:
type: simple
## 如果 type 配置为 redis,则该项可按需配置# redis:## 是否缓存空值,保存默认即可# cache-null-values: false## 缓存过期时间,24 小时# time-to-live: 86400# flyway:# enabled: false# clean-disabled: true## baseline-on-migrate: true# table: dlink_schema_history# Redis 配置#sa-token 如需依赖 redis,请打开 redis 配置和 pom.xml、dlink-admin/pom.xml 中依赖# redis:# host: localhost# port: 6379# password:# database: 10# jedis:# pool:# # 连接池最大连接数(使用负值表示没有限制)# max-active: 50# # 连接池最大阻塞等待时间(使用负值表示没有限制)# max-wait: 3000# # 连接池中的最大空闲连接数# max-idle: 20# # 连接池中的最小空闲连接数# min-idle: 5# # 连接超时时间(毫秒)# timeout: 5000servlet:
multipart:
max-file-size: 524288000
max-request-size: 524288000
enabled: true
server:
port: 8888
mybatis-plus:
mapper-locations: classpath*:/mapper/*Mapper.xml
#实体扫描,多个 package 用逗号或者分号分隔typeAliasesPackage: com.dlink.model,com.dlink.detection.model,com.dlink.detection.vo
global-config:
db-config:
id-type: auto
configuration:
##### mybatis-plus 打印完整 sql (只适用于开发环境)log-impl: org.apache.ibatis.logging.stdout.StdOutImpl
#log-impl: org.apache.ibatis.logging.nologging.NoLoggingImpl# Sa-Token 配置sa-token:
# token 名称 (同时也是 cookie 名称)token-name: satoken
# token 有效期,单位 s 默认 10 小时,-1 代表永不过期timeout: 36000
# token 临时有效期 (指定时间内无操作就视为 token 过期) 单位:秒activity-timeout: -1
# 是否允许同一账号并发登录 (为 true 时允许一起登录,为 false 时新登录挤掉旧登录)is-concurrent: false
# 在多人登录同一账号时,是否共用一个 token (为 true 时所有登录共用一个 token, 为 false 时每次登录新建一个 token)is-share: true
# token 风格token-style: uuid
# 是否输出操作日志is-log: false
knife4j:
enable: true
dinky:
dolphinscheduler:
enabled: false
# dolphinscheduler 地址url: http://127.0.0.1:5173/dolphinscheduler
# dolphinscheduler 生成的 tokentoken: ad54eb8f57fadea95f52763517978b26
# dolphinscheduler 中指定的项目名不区分大小写project-name: Dinky
# Dolphinscheduler DinkyTask Addressaddress: http://127.0.0.1:8888
# python udf 需要用到的 python 执行环境python:
path: python
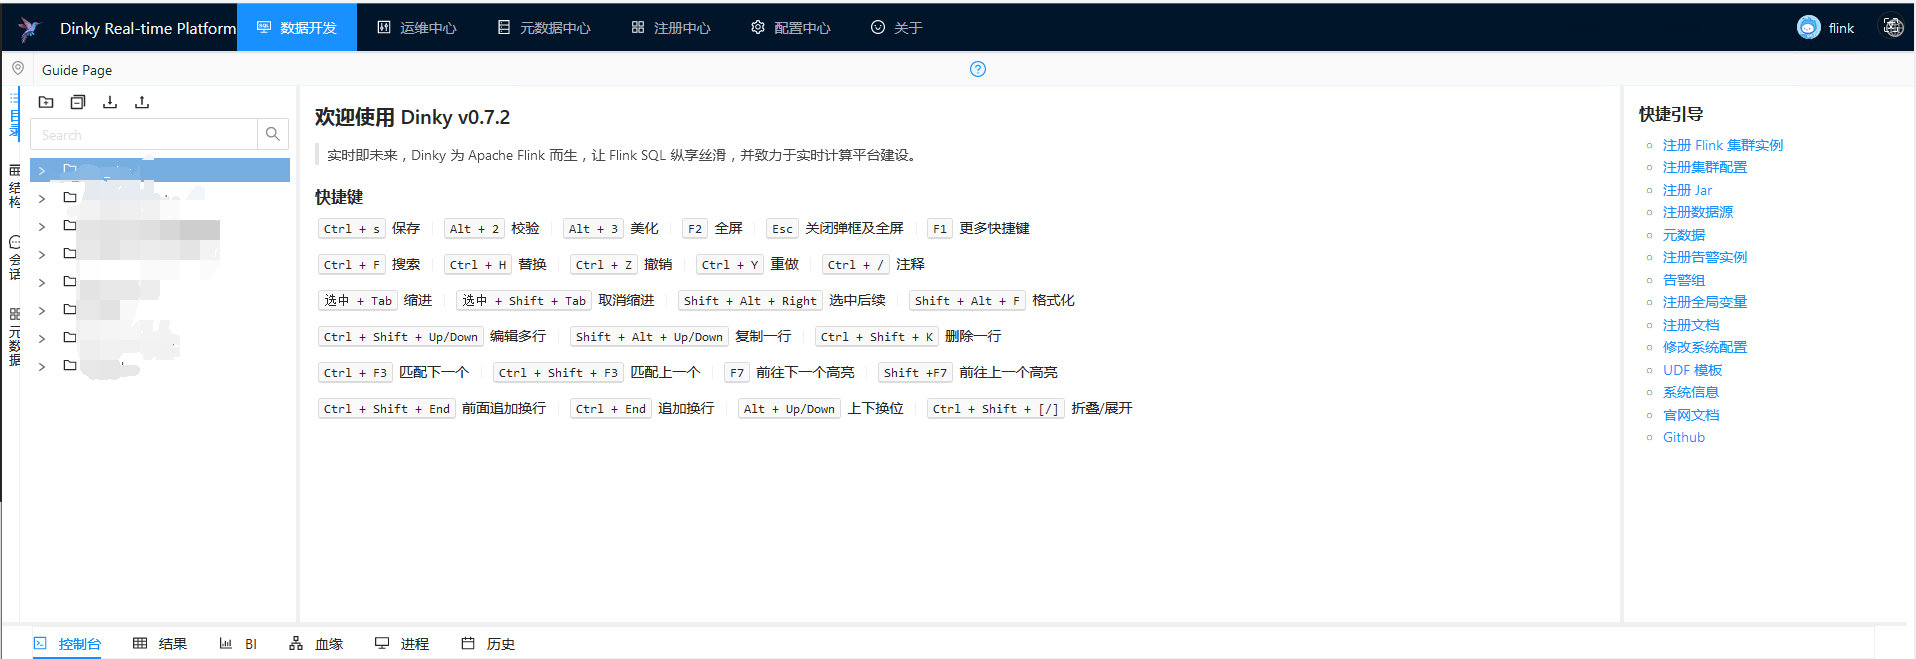
启动 dlink,并指定 flink 的版本
sh auto.sh start 1.14
访问页面确定是否启动
![]()
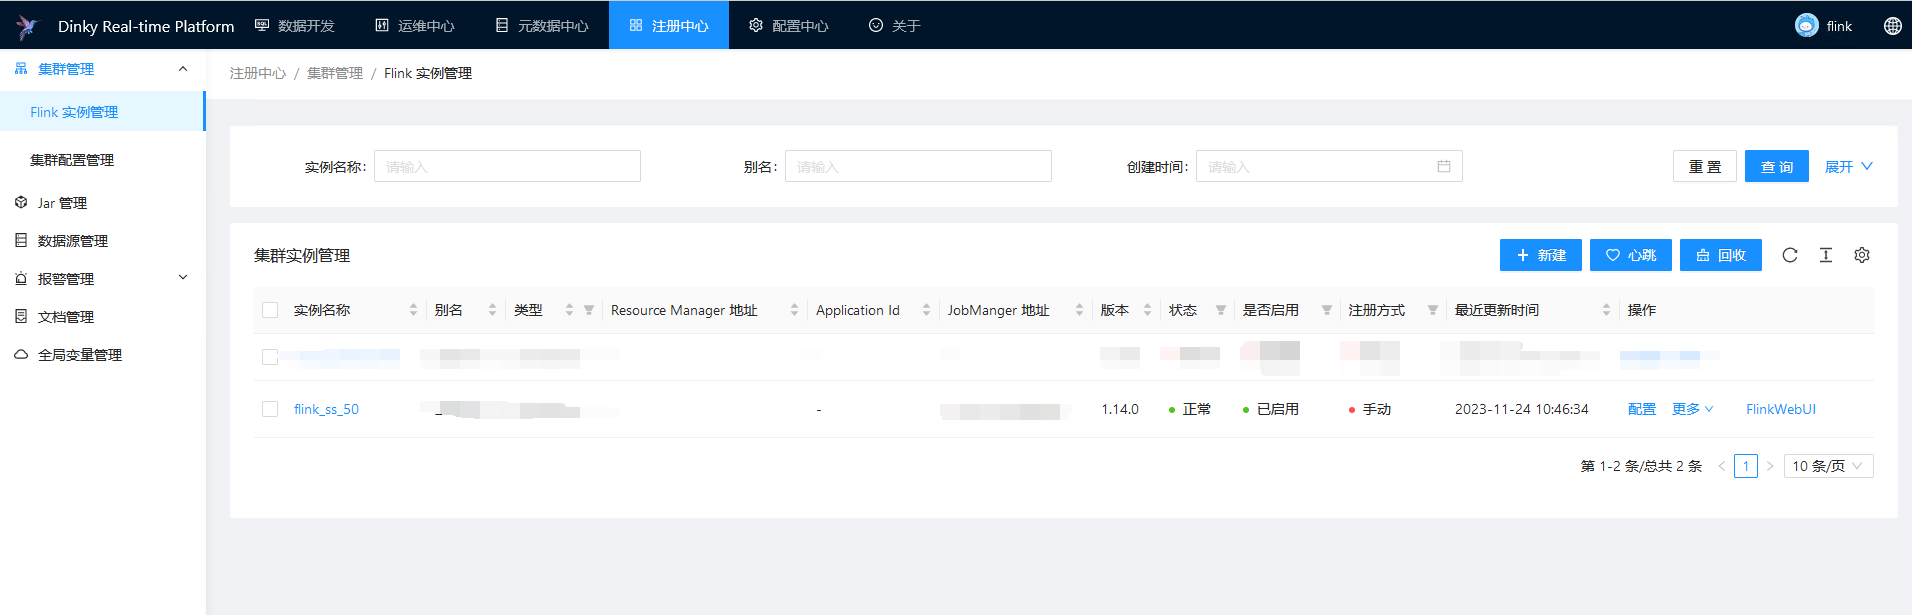
由于很多任务连接的数据库是一样的,所以我们可以在注册中心配置通用的数据库连接,在启动任务开启全局变量替换
需要在注册中心注册 flink 实例
![]()
如果需要将 sqlserver 的数据实时对接到 starrocks,那么 sqlserver 就需要记录变更情况,sqlserver 记录变更情况需要为对应的数据库和表开启 CDC
sqlserver cdc开启
开启cdc日志 注意日志保留时间,默认为3天 需要根据flink保存点和检查点的保留时间来做调整开启方式:
-- 查看库表是否启动 CDC-- 查看数据库是否启用 cdcSELECT name,is_cdc_enabled FROM sys.databases WHERE is_cdc_enabled = 1;
-- 查看当前数据库表是否启用 cdcSELECT name,is_tracked_by_cdc FROM sys.tables WHERE is_tracked_by_cdc = 1;
-- 数据库启用和禁用 CDC-- 对当前数据库启用 CDCUSE MyDBGO
EXECUTE sys.sp_cdc_enable_db;
GO
-- 对当前数据库禁用 CDCUSE MyDBGO
EXEC sys.sp_cdc_disable_db
GO
-- 数据库表启用和禁用 CDC-- 启用USE MyDBGO
EXEC sys.sp_cdc_enable_table
@source_schema = N'dbo',
@source_name = N'MyTable',
@role_name = NULL
GO
-- 禁用USE MyDBGO
EXEC sys.sp_cdc_disable_table
@source_schema = N'dbo',
@source_name = N'MyTable',
@capture_instance = N'dbo_MyTable'
GO
-- 批量启动表begindeclare @temp varchar(100)
-- 申明游标为表名declare tb_cursor cursor
for (select name from sys.tables WHERE is_tracked_by_cdc=0 and schema_id=1 and name in('bankManage','dist'))
-- 打开游标open tb_cursor-- 开始循环游标变量fetch next from tb_cursor into @temp
-- 返回 fetch 语句执行的最后游标的状态while @@fetch_status=0
beginEXEC sys.sp_cdc_enable_table
@source_schema = 'dbo',
@source_name = @temp,
@role_name = NULL
-- 转到下一个游标fetch next from tb_cursor into @temp
end-- 关闭游标close tb_cursor-- 释放游标deallocate tb_cursorend ;
-- 查看表 CDC 功能是否启用SELECT name ,
is_tracked_by_cdc ,CASE WHEN is_tracked_by_cdc = 0 THEN 'CDC功能禁用'
ELSE 'CDC功能启用'
END 描述FROM sys.tables;
-- 可能出现权限错误问题-- 开启授权ALTER AUTHORIZATION ON DATABASE::[MyDB] TO [sa]
需开启 SQL Server Agent 服务-- 开启 cdc 的表如果有 text 类型的字段保存出错可能是保存的内容太大-- 通过以下命令调整 CDC 处理的最大数据字节exec sp_configure 'show advanced options', 1 ;
reconfigure;
-- -1 表示不限制exec sp_configure 'max text repl size', -1;
reconfigure;
使用 StarRocks 提供的
smt工具可以很方便的生成对应的 flinkSql 和 starrocks 的建表语句,建好 starrocks 的表后直接新建需要对接数据表的任务CREATE TABLE `table1_src` (
`id` INT NOT NULL,
`sno` INT NULL,
`title` STRING NULL,
`distNo` STRING NULL,
`distName` STRING NULL,
`landNo` STRING NULL,
`landName` STRING NULL,
`description` STRING NULL,
`address` STRING NULL,
`area` DECIMAL(19, 4) NULL,
PRIMARY KEY(`id`)
NOT ENFORCED) with (
'connector' = 'sqlserver-cdc',
'username' = '${ss_username}',
'password' = '${ss_password}',
-- 这里的配置是防止在读取 sqlserver 的时候不要锁表 可以去 debezium 官网查看其他配置参数说明'debezium.snapshot.lock.timeout.ms' = '-1',
'debezium.snapshot.isolation.mode' = 'read_committed',
'database-name' = 'database1',
'table-name' = 'table1',
'schema-name' = 'dbo',
'hostname' = '${ss_hostname}',
'port' = '${ss_port}'
);
CREATE TABLE `table1_sink` (
`id` INT NOT NULL,
`sno` INT NULL,
`title` STRING NULL,
`distNo` STRING NULL,
`distName` STRING NULL,
`landNo` STRING NULL,
`landName` STRING NULL,
`description` STRING NULL,
`address` STRING NULL,
`area` DECIMAL(19, 4) NULL,
PRIMARY KEY(`id`)
NOT ENFORCED) with (
'username' = '${ss_sr_username}',
'password' = '${ss_sr_password}',
'sink.properties.strip_outer_array' = 'true',
'load-url' = '${ss_sr_load-url}',
'sink.properties.format' = 'json',
'connector' = 'starrocks',
'database-name' = 'table1',
'sink.properties.ignore_json_size' = 'true',
'sink.max-retries' = '10',
'jdbc-url' = '${ss_sr_jdbc-url}',
'sink.buffer-flush.interval-ms' = '1000',
'table-name' = 'database1'
);
INSERT INTO `table1_sink` SELECT * FROM `table1_src`;
可以在 starrocks 中对应的表的数据有变化,在 sqlserver 新增修改删除数据,对应的 starrocks 也会变化
新建一个 springboot 项目 map-data(具体内容可以在博客找到),只提供通用查询的功能 因为 starrocks 也是 mysql,所以用的 mysql 驱动
表结构:
select * from select_config
select_name select_sql
assets_zy select * from databases1.table1;
接口:
getData (String selectName, String queryMap) 只需要传对应的查询名称,和查询参数就可以对应的通过 starrocks 查询数据
# 参考资料
flink-cdc